• Submit Photos
  • Featured Badge
  • Contributors
  • Become a Wedding Blogger
  • Advertise

The Inspired Bride

Wedding inspiration resources & ideas to help you plan your wedding

  • Home
  • Inspiration
    • Season
      • Summer
      • Spring
      • Fall
      • Winter
    • Styles
      • Rustic
      • Casual
      • Modern
      • Traditional
      • DIY
      • Vintage
      • Whimsical
      • Glamour
      • Luxury
      • Bohemian
    • Wedding
      • Real Weddings
    • Engagement
    • Styled Shoot
    • Bridal Shoot
    • Bridal Shower
    • Honeymoon
    • Bachelorette / Bachelor Party
    • Trash the Dress
  • Vendors
  • Photographers
  • Planning
    • Tips and Tricks
    • DIY Projects
    • Inspiration Boards
    • Planning Tools
    • Resources
  • Destination Weddings
  • Popular
  • More..
    • Accessories
    • Big Ideas, Tiny Budget
    • Bouquets and Flowers
    • Bridal Showers
    • Bridesmaids
    • Cakes
    • DIY
    • Ceremony
    • Color Palettes
    • Decorations
    • Favors
    • For the Guys
    • Giveaways
    • Groomsmen
    • Guest Posts
    • Honeymoon
    • Inspiration Shoots
    • Invitations & Stationery
    • Just for Fun
    • News Blips
    • Personal Touches
    • Real Engagements
    • Registry
    • Rings
    • Services and Vendors
    • Sponsored Posts
    • Trending Now…
    • Wedding 101
    • Wedding Dresses

DIY Paper Dahlia – The Oversized Paper Version of the Beloved Spring Flower

by Carla 8 Comments

diy paper dahlia

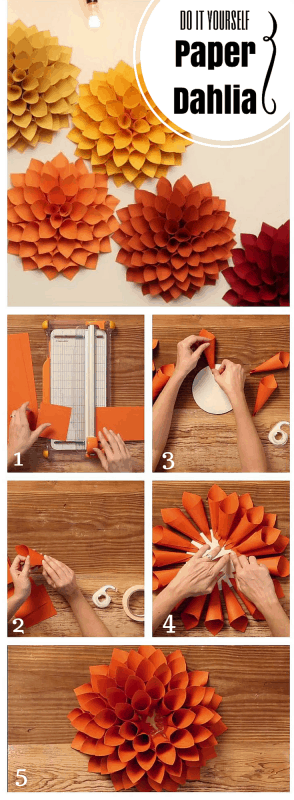
Dahlia is one of the favourite spring flowers and you can make your own oversized paper version with the materials you can easily find in a craft store. If wedding bells will ring this spring, then add these lovely paper dahlias to your special day. Celebrate the sun shining, birds chirping, trees growing and love blooming with this creative project.

What you need:

  1. 7 pieces cardstock (color of your choice)
  2. Paper cutter
  3. Double sided-tape
  4. Circle cardboard

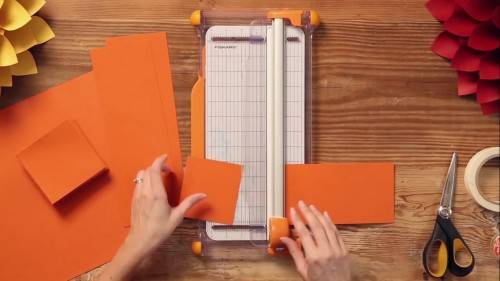
Grab the cardstocks and cut them into perfect 4-inch squares. It is better to use paper cutter for accurate and fast cut.
DIY Paper Dahlia

Step 1: Cut the cardstock into 4-inch squares.

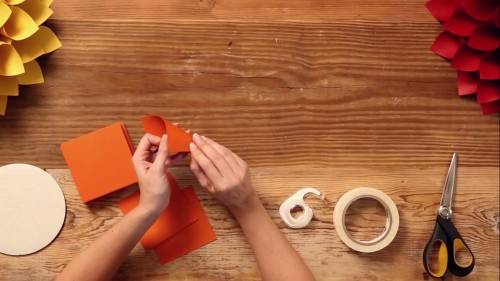
If you created about 60 pieces of squares, then you are ready to turn them into cones. Place a double-sided tape on one edge of the square. Then, bring the opposite corner about halfway across the square and bring the tape into the side over to overlap it. Secure the paper as we do not want these cones to open while we are making our flower. Repeat the process until you have 60 cones.
DIY Paper Dahlia

Step 2: To make the cone, bring the opposite corner about halfway across the square and bring the tape into the side over to overlap it.

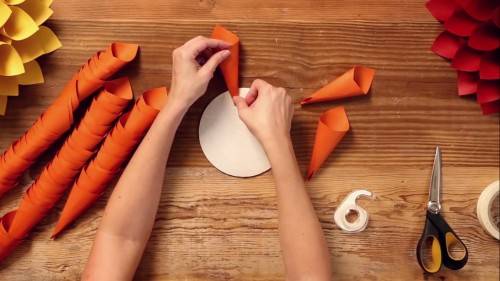
Once finished, it is time to assemble the cones on the circle base. Place one layer of double-sided tape around the outside of the base.  Before placing the cones, flatten its bottom about half an inch or so. Then, carefully press down the cone on the base. Continue working around the base creating the first layer of your flower. Make sure the cones are about half an inch apart.
DIY Paper Dahlia

Step 3: Create the first layer of the flower by placing the cones around the circle base about half an inch apart.

Now, we are to create the second layer. Place the cones in between the first one. Continue working around the base.
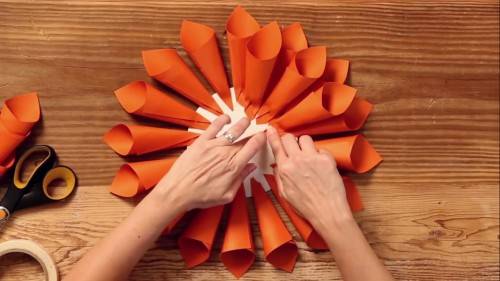
DIY Paper Dahlia

Step 4: Create the second layer by placing the cones in between the first one.

Repeat the process for the third, fourth and fifth layers.
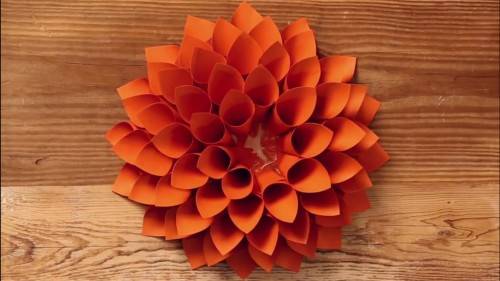
DIY Paper Dahlia

Step 5: Continue working for the third, fourth and fifth layers.

And you are done! You can make more and more paper dahlia with the color of your choice.
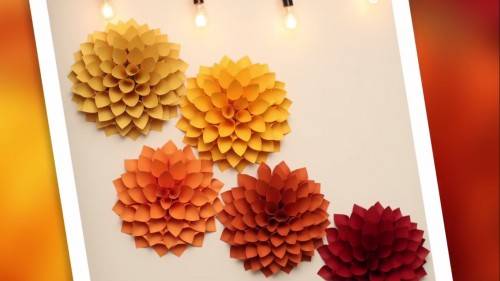
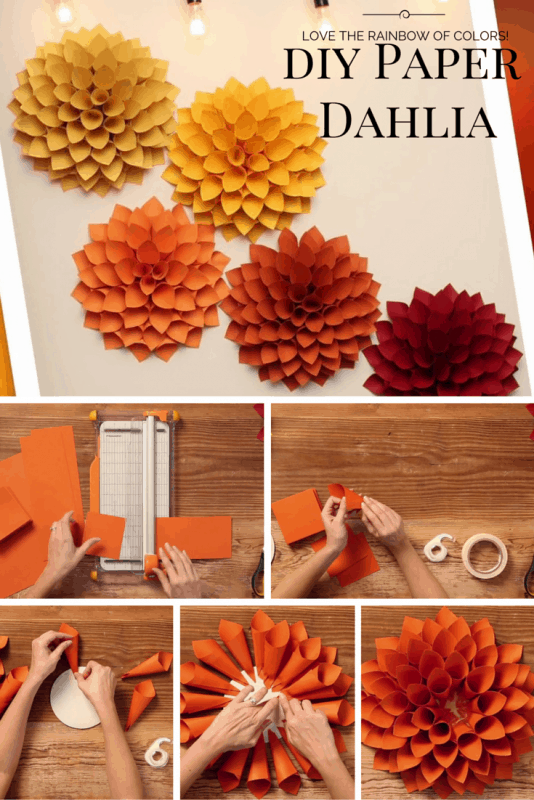
DIY Paper Dahlia

Step 6: Create more paper dahlia with the desired color and size.

Watch How it is Done

Save All the Steps Above using this Bookmarklet

diy paper dahlia

Filed Under: Do It Yourself

The opinions expressed here by The Inspired Bride editors are their own, not those of The Inspired Bride or TWBN.

Comments

  1. RaDonna Burik says

    I followed directions using two sided tape with the card stock, the next day 25 of the 30 taped cones were open. I made sure that the tape was firmly pressed. Other videos show glue gun being used versus double sided tape. Money down the drain for tape and package of card stock as well as 2 hours work of crafting time – ugg. Has anyone had this problem?

    Reply
    • Donna cooper says

      What size cardboard did you use? 12 inch plate using, seems so smaa, what do you think?

      Reply
    • Manita Choate says

      I used regular paper and it did the same thing. I used a regular glue stick and it worked much better.

      Reply
  2. Machelle Webb says

    Personally I use a glue gun. However, in her defense, she does state “Secure the paper as we do not want these cones to open while we are making our flower.” In my mind I took that as add additional tape to the outside to make sure in stays in place.

    As far as the cardstock being a waste???? I waste nothing!!!! I would’ve grabbed a glue gun & rolled those same pieces and glued them.

    Crafting is trial and error. I couldn’t begin to add up the hours I’ve put in to projects that didn’t turn out as the directions. But, I always try again. Usually by the second time I can get things completed better. Trial AND error. 🙂

    :

    Reply
  3. Carolyn says

    Made my first tissue paper flowers turned out great very simple can’t wait to try the cardstock Delia’s

    Reply
  4. Marie Protaskey says

    circle like plate , how much inches for circle?

    Reply
  5. Alahia Metcalfe says

    Could this be made in a smaller size? I want to use them in my bouquet but the large size would be too big obviously. I am thinking that the larger ones would be great for on my wedding arch.

    Reply
  6. Brenda says

    Very easy and I love the way the flowers came out. I recommend going straight to hot glue when creating the cones, especially of using card stock. Double sided tape and glue stick wouldn’t hold the shape.

    Reply

Leave a Reply Cancel reply

Your email address will not be published. Required fields are marked *

This site uses Akismet to reduce spam. Learn how your comment data is processed.

Popular

  • What Can Your Flower Girl Carry Down the Aisle Instead of Flowers?
  • So you love the color gold and you know this will be one of your wedding colors but you’re not sure about the others. We want to share some gold color pallets along with some tips on your wedding color palette especially for choosing a great companion color for gold. Wedding Color Palette: Gold
  • 10 Stunning Tea Length Wedding Dresses
  • Wedding Date Superstitions You Need to Know Wedding Date Superstitions You Need to Know
  • How to Plan a Potluck Wedding
  • Archive
  • Popular
  • About
  • Advertise
  • Badge
  • Contact

All Content Copyright © 2009-2023. The Inspired Bride unless otherwise noted or credited.
Please refer to our Content Usage Guidelines if you wish to use any of the content on this website.
In full disclosure, this post may contains links to help support my site.
Terms of Service | Privacy Policy | DMCA | Contact