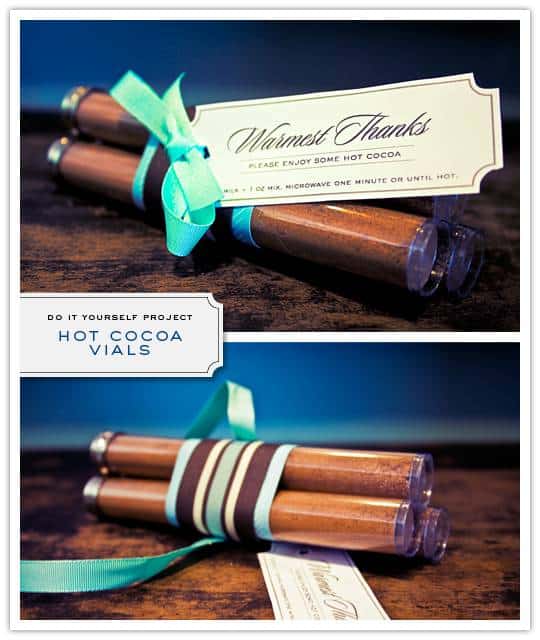
Now that the recipes are out of the way, time to get to those tubes! This is really a great favor idea for cool weather weddings, but I’m seriously starting to consider doing it for holiday presents, too! We’ve provided a tag for you for this project, but feel free to create your own – just make sure to let the guests know how much mix to put in each cup they make! Each vial will make between 1-2 drinks (8 ounces of milk, not water), depending on how rich the drinker likes their cocoa.

What You’ll Need:
Plastic Vials with Metal Caps (our are from SKS Bottle – the 40ml size)
Paper Wrap, Measuring 2″ x 6″ (our design is available here in PDF form)
Ribbon, in Two Different Widths (ours are 2″ and ½”)
Scissors
Hot Glue Gun and Glue
Double Stick Tape
Optional Favor Tag (ours is available here in PDF form) and Hole Punch
STEP ONE: Fill three plastic vials with cocoa mix (same flavor, or different varieties). Stack them horizontally in a pyramid formation and hold the ends tight to keep them together.
STEP TWO: Attach a strip of double stick tape to one end of the paper wrap, and attach it to the top of the vial at the top of the pyramid. Wrap the paper strip around the pyramid of vials until both ends meet and overlap. Attach a strip of double stick tape to the back of the end that is not attached to the vials. Press that end onto the area where the wrap overlaps to secure.
STEP THREE: Cut a length of your thicker ribbon that is approximately 6″ long. Attach the end of the ribbon to the paper wrap with a small dot of hot glue near the paper wrap’s seam. Wrap the ribbon around the pyramid and secure the other end with another small dot of glue.
STEP FOUR: Face the side of the pyramid with the wrap and ribbon seam down. This will now be your bottom side. Cut a length of your thinner ribbon to about 8″ long. Fold it in half to find the center and put a dot of hot glue on it. Quickly attach the ribbon to one of the sides of the pyramid that is not the bottom seam side. All of the ribbon but the center point should be free to move around.
STEP FIVE: This step is optional – only worry about this if you plan on adding a note tag. Cut out the tag out and use a hole punch to create a space to feed one side of the thinner ribbon through.
STEP SIX: Finish your favor off by tying ribbon into a bow.
OMG! I love it!
These are so cute! I’m thinking I might give out these instead of/along with Christmas this year!
Such a great gift!!!!
I love this idea! So sweet and who doesn’t love hot chocolate? Thanks so much, I’ll be linking.
What an adorable idea! Perfect for those winter weddings. I might have to suggest them to my February bride!
What a great idea!! Last year we got a CD favor custom made by the Bride and Groom to fit their Winter Wedding. I can just picture enjoying the hot coco while listening to the songs from the wedding and remembering what a sweet time it was!
I am not a bride-to-be but I just HAD to comment on these. I was trying to find the perfect (and cheap) homemade gifts for the holidays for friends and family and this idea is IT! I’m also thinking about using some of your candy tin ideas and making them “holiday” esque and making little gift bags. Thank you so much. I just ADORE everything you post!
I have checked out the place you have got your vials from, they are really pricey, any ideas where to get cheaper vials from?
I found this and sent to my niece for her January 2012 wedding as favors. They are perfect!
I used this tutorial to make the favors for my February 2011 wedding and LOVED them. Thank you so much for posting!
I’ve linked to your tutorial from my blog post of my favors, which turned out amazing.
http://www.mrsjsteed.blogspot.com/2011/11/wedding-wednesday-hot-chocolate-favors.html